[et_pb_section fb_built=”1″ _builder_version=”3.22″][et_pb_row _builder_version=”4.4.9″ background_size=”initial” background_position=”top_left” background_repeat=”repeat”][et_pb_column type=”4_4″ _builder_version=”3.25″ custom_padding=”|||” custom_padding__hover=”|||”][et_pb_text _builder_version=”4.4.9″ background_size=”initial” background_position=”top_left” background_repeat=”repeat”]It’s no secret that Sublime Text has an extensive, robust set of features of which not all users might be aware. I’m here to share with you some of the ones that I find myself most often used to reduce the tediousness of repetitive tasks, and increase overall efficiency while developing in Alloy/Titanium. I will be posting hotkeys for all platforms at the top of each section, but for readability’s sake and it is the platform I primarily develop on (and because I went through the trouble of finding the ⌘ symbol to copy/paste), I will be focusing mainly on the Mac hotkeys for the majority of the blog.
Multi-line Selection
- Windows: Ctrl-Left Click, Ctrl-Alt-Up/Down
- Mac: ⌘-Left Click, Ctrl-Shift-Up/Down
This feature is the bread-and-butter of Sublime Text in its ⌘-Click incarnation, but did you know that Ctrl-Shift in combination with the Up and Down arrows on your keyboard achieves a similar effect without having to waste precious seconds reaching for that peripheral? For the uninitiated, this feature allows you to create multiple cursors in your file, making features such as creating numerous, similar elements, or editing large blocks of similar code incredibly expedient. Ctrl-Shift-Up/Down expands your cursor above and below its current location, giving you control of multiple lines. If you accidentally go a line too far, ⌘-U will incrementally revert your line expansions.
example
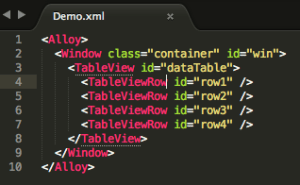
These rows we created all need to be styled identically.
How about we add a class?

Ctrl-Shift-Down a few times…

…and bam! Class added, no additional typing or copy/pasting necessary
The applications for this feature are too numerous to go into in such a short blog, but I encourage you to play around with it. Once you’ve gotten the hang of it, formatting, styling, adding, and removing code will look and feel like a relaxing ballet of dancing characters and symbols, rather than a chore.
Column or “Block” Highlighting
- The commands for this are numerous, so check out their docs here.
Going hand in hand with multi-line selection, highlighting blocks of code is a more esoteric, yet nonetheless potent feature of the text editor. Alt-Click and Dragging on Mac will ignore all formatting in place and highlight whatever you have selected into a neat, concise block. I don’t use this as much, but it is particularly nice in TSS files where I have properties like borderRadius, borderWidth, and borderColor all sitting in a nice row just waiting to get styled.
Repeat Highlighting
- Windows: Ctrl-D
- Mac: ⌘-D
With nothing highlighted, pressing ⌘-D grabs whatever is directly in front of your cursor and highlights it up to the next logical stopping point. Your cursor is in front of some whitespace? This will highlight up to the next text. In front of the text? It highlights up to the next separator. You can also, of course, manually highlight what your desired selected area, but this is when that Sublime Text greatness kicks in: subsequent presses of ⌘-D will additively highlight the next instance of your current selection. The synergy between this feature and multi-line editing cannot be understated.
XML files are a great example of where this shines. Multi-line and block selection are not of much use if all of the elements/id’s/classes you need to edit are on different columns. With ⌘-D, you can select each of them one-by-one. But wait, there’s more! Should you decide that not every single instance of your selected code needs highlighting, ⌘-K,D skips over your current selection and highlights the next instance instead. It’s awesome.
example

After highlighting the first dataRow, Sublime Text already starts pointing out subsequent instances.
It’s chomping at the bit to make your life easier!

A few more keypresses and we have a nice set of highlights

Whoops! Didn’t need that third one, so we skip it with ⌘-K, D
Block Indentation
- Windows: Ctrl-] , Ctrl-[
- Mac: ⌘-] , ⌘-[
While one of my most frequent uses of Ctrl-Shift-Up/Down is to indent blocks of code, you may have noticed that it will only expand your cursor to a column on the line that already exists; that is, it won’t create whitespace that does not already exist, and as such will snap to the left if you have lines that you skipped for readability. This can be annoying if you’re trying to indent with multiple lines selected, but fear not! After highlighting any block of code, a simple click of ⌘-[ or ⌘-] will indent that block one tab left or right, respectively. Easily one of my favorite shortcuts, this feature makes formatting code incredibly quick and easy.
And finally, Highlight Scope
- Windows: Ctrl-Shift-Space
- Mac: ⌘-Shift-Space
This feature is highly underrated, in my opinion. It’s a useful debugging tool, especially when you’re working with a large function in your controller that may have a misplaced bracket somewhere. It does what its name implies: key in the command and you will highlight the next step up in scope, starting at your cursor’s location.
example


Sublime Text also has a package manager, through which you can download numerous plugins to improve its functionality and tailor its usage to your needs. I currently have it linting my JS files, indicating my currently uncommitted changes, and integrating Git feature like Status and Blame (but that might be a blog post for another time). On top of everything, Sublime Text is made available on Windows, OSX, and Linux, entirely free of charge, though you can choose to support the developer by purchasing it. It is an undeniably valuable tool in any developer’s kit and is a delight to use.[/et_pb_text][/et_pb_column][/et_pb_row][/et_pb_section]
It’s no secret that Sublime Text has an extensive, robust set of features of which not all users might be aware. I’m here to share with you some of the ones that I find myself most often used to reduce the tediousness of repetitive tasks, and increase overall efficiency while developing in Alloy/Titanium. I will be posting hotkeys for all platforms at the top of each section, but for readability’s sake and it is the platform I primarily develop on (and because I went through the trouble of finding the ⌘ symbol to copy/paste), I will be focusing mainly on the Mac hotkeys for the majority of the blog.
Multi-line Selection
- Windows: Ctrl-Left Click, Ctrl-Alt-Up/Down
- Mac: ⌘-Left Click, Ctrl-Shift-Up/Down
This feature is the bread-and-butter of Sublime Text in its ⌘-Click incarnation, but did you know that Ctrl-Shift in combination with the Up and Down arrows on your keyboard achieves a similar effect without having to waste precious seconds reaching for that peripheral? For the uninitiated, this feature allows you to create multiple cursors in your file, making features such as creating numerous, similar elements, or editing large blocks of similar code incredibly expedient. Ctrl-Shift-Up/Down expands your cursor above and below its current location, giving you control of multiple lines. If you accidentally go a line too far, ⌘-U will incrementally revert your line expansions.
example
These rows we created all need to be styled identically.
How about we add a class?
Ctrl-Shift-Down a few times…
…and bam! Class added, no additional typing or copy/pasting necessary
The applications for this feature are too numerous to go into in such a short blog, but I encourage you to play around with it. Once you’ve gotten the hang of it, formatting, styling, adding, and removing code will look and feel like a relaxing ballet of dancing characters and symbols, rather than a chore.
Column or “Block” Highlighting
- The commands for this are numerous, so check out their docs here.
Going hand in hand with multi-line selection, highlighting blocks of code is a more esoteric, yet nonetheless potent feature of the text editor. Alt-Click and Dragging on Mac will ignore all formatting in place and highlight whatever you have selected into a neat, concise block. I don’t use this as much, but it is particularly nice in TSS files where I have properties like borderRadius, borderWidth, and borderColor all sitting in a nice row just waiting to get styled.
Repeat Highlighting
- Windows: Ctrl-D
- Mac: ⌘-D
With nothing highlighted, pressing ⌘-D grabs whatever is directly in front of your cursor and highlights it up to the next logical stopping point. Your cursor is in front of some whitespace? This will highlight up to the next text. In front of the text? It highlights up to the next separator. You can also, of course, manually highlight what your desired selected area, but this is when that Sublime Text greatness kicks in: subsequent presses of ⌘-D will additively highlight the next instance of your current selection. The synergy between this feature and multi-line editing cannot be understated.
XML files are a great example of where this shines. Multi-line and block selection are not of much use if all of the elements/id’s/classes you need to edit are on different columns. With ⌘-D, you can select each of them one-by-one. But wait, there’s more! Should you decide that not every single instance of your selected code needs highlighting, ⌘-K,D skips over your current selection and highlights the next instance instead. It’s awesome.
example
After highlighting the first dataRow, Sublime Text already starts pointing out subsequent instances.
It’s chomping at the bit to make your life easier!
A few more keypresses and we have a nice set of highlights
Whoops! Didn’t need that third one, so we skip it with ⌘-K, D
Block Indentation
- Windows: Ctrl-] , Ctrl-[
- Mac: ⌘-] , ⌘-[
While one of my most frequent uses of Ctrl-Shift-Up/Down is to indent blocks of code, you may have noticed that it will only expand your cursor to a column on the line that already exists; that is, it won’t create whitespace that does not already exist, and as such will snap to the left if you have lines that you skipped for readability. This can be annoying if you’re trying to indent with multiple lines selected, but fear not! After highlighting any block of code, a simple click of ⌘-[ or ⌘-] will indent that block one tab left or right, respectively. Easily one of my favorite shortcuts, this feature makes formatting code incredibly quick and easy.
And finally, Highlight Scope
- Windows: Ctrl-Shift-Space
- Mac: ⌘-Shift-Space
This feature is highly underrated, in my opinion. It’s a useful debugging tool, especially when you’re working with a large function in your controller that may have a misplaced bracket somewhere. It does what its name implies: key in the command and you will highlight the next step up in scope, starting at your cursor’s location.
example
Sublime Text also has a package manager, through which you can download numerous plugins to improve its functionality and tailor its usage to your needs. I currently have it linting my JS files, indicating my currently uncommitted changes, and integrating Git feature like Status and Blame (but that might be a blog post for another time). On top of everything, Sublime Text is made available on Windows, OSX, and Linux, entirely free of charge, though you can choose to support the developer by purchasing it. It is an undeniably valuable tool in any developer’s kit and is a delight to use.
Sign up for the Shockoe newsletter and we’ll keep you updated with the latest blogs, podcasts, and events focused on emerging mobile trends.